Showing posts with label Tools. Show all posts

Sunday, July 14, 2013

When not to work...


The other afternoon I has some time to work on Tiki. After deciding to mill a channel in a stringer I set up the dado blades on my trusty old, cheap, Craftsmen table saw. Looking at the picture you can see there are zero "safety" gadgets on this saw. I put safety in quotes since in my experience many of these gadgets just get in the way and make power tools more dangerous. But and its a BIG BUT, these power tools must be treated with respect! Think things through, total concentration. These tools are like a Black Mamba ready to strike. Ready to take a finger off or kill. So here I was about to pass these stringers through.  The problem was, my mind wasn't ready. I was in a funk which had my mind wandering off on stupid tangents. I was an accident waiting to happen. Thankfully I recognized the situation and I just stopped, put everything down and walked away.

I wish I could say I had this type of awareness all the time:) As I've gotten older I do find myself thinking through the "What ifs" of situations much more often. In part this means I always wear a face shield when working with power tools that throw material and wear a respirator when power sanding fiberglass or working with fillers like West System 406 Colloidal Silica.

Saturday, May 11, 2013

Feeling like a wingnut......


Alright, this is really a basic safe shop practice, leave the shop when tired. Tiredness is the proximate cause of spilling Acetone on the battery and charger for my Ryobi drill and saw. Chain of events, first clean a piece of work, but leave the can sitting on the floor and the cap not tightened, first bad move. Next move the charger to the epoxy table, why I did this I don't recall but obviously another bad move. Then grab the acetone can and attempt to place it next to the charger on the epoxy table, but instead allow it to slip from the hand and spill a cup of acetone on the plugged in charger. I'm not a chemist but I know acetone will melt plenty of plastics and wow did it eat up that charger. The black sections quickly became soft and the obvious staining on the battery. Not much to do to but unplug and allow the acetone to evaporate. The question is whether the circuity in the charge has been damaged? I'll open it up and give a visual when we get back and hope for the best.

Sunday, June 3, 2012

When it doesn’t add up, STOP. ----154 hrs


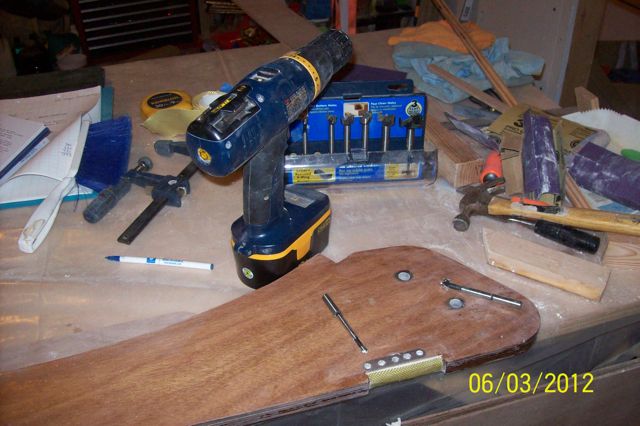
Today progressed from strictly bulkhead work to the sternpost/skeg.(aft most part of the hull where the rudder will attach). Last fall I slotted and epoxy filled the areas where the rudders will be lashed on and added kevlar tape to some of the wear areas. Today I decided to drill out the holes for the rudder lashing. I thought for sometime about using a small drill press I have but thinking about the rigamarole of setup I decided to just use my cordless drill and forstner bits. By laying the sternpost horizontal and using the bubble level in the rear of the drill it was pretty easy to get decently straight holes. The STOP in the title refers the adjacent picture. I need to return to kindergarten and relearn my counting. First person to identify my problem wins a Guinness stout. You’ll need to stop by the house to collect, but be warned I may put you to work:)
Problem??


Just watch the bubble.


On the bulkhead front, I decided to add 6oz fiberglass to the lower sections that will become the buoyancy compartments. My thought is these areas can get condensation which will settle to the bottom and likely be unnoticed for weeks if not months. My experience with just coating plywood with 2 or 3 layers of just epoxy is it can fail when constantly submerged. But when cloth is added, no problems. So at the weight penalty of literally about 18oz for both hulls, I’d rather be sure the lower bulkheads don’t eventually rot. 


BH1 lower forward buoyancy compartment side getting 6oz fiberglass


Todays favorite tools are the Ryobi Cordless 18V Drill and Forstner bits. I get hours and hours of use out of one charge and I have enough things that need a plug, But what puts this over the top are the Forstner bits. They aren't cheap but they bore flat bottomed holes and have near zero tear out at the edge of the holes. 


Hero tools of the day:) Also the traveller rigging holes are drilled out. 

Saturday, June 2, 2012

Hi ho, hi ho, it’s off to work I go.... --- 146 hrs

…..well that’s said with a little grin. After all who can call building a terrific Tiki catamaran work? Actually we cleaned up the shop area a few days ago and got in about 3 hrs of work on the Tiki. Some of that time was just figuring out were we left off 7 months ago.
Bulkheads 1,2, and 3 with final epoxy coat. 


Our current push is to get the bulkheads for the port hull completed. The plans say to get these complete as possible since they are much easier to work on while laying on a bench then when they are in the hull. So step one the other day was surveying each bulkhead and listing what remaining work is needed. The list has items like, “bunk bearer aft side(BH3)”, “fillet under floor bearer(BH3)”, “finish cutting out (BH7)”. 

Today the last couple 20x32 mm douglas fir floor/bunk bearer  and larger curved deck bearers were installed.  In order of bearer build difficulty its floor easiest then bunk and finally the deck bearers require most work. The floors are just straight pieces with ends angled to the bulkhead. The bunk bearers at same as floor plus notches for stringers. Then the deck adds to bunk by making the top curved. This is so ultimately the deck will have a curve, making it stronger and shed water more easily. 

Building the bulkheads also brings up other issues, such as, access to buoyancy compartments. Plans call for a 6inch access plate in BH1,BH6, and BH7. I had thought of building wood access plates but when I asked on the Wharram Builders forum about this , Scott Williams said he used Beckson and that there will be plenty of wood building. After looking things over I decided to go with the 8inch ID access plates. This will give more reach in room without weakening the bulkheads. But the $24/each price tag was a little hard to swallow. Even the 6inch were $16/each. The forward buoyancy compartment is about 70inchs BH to Stem so even with an 8inch access plate not the entire volume can be reach by hand.

Time for a favorite tool, the table saw! My old Sears POS has been dragged from one house to the next for probably 25 years. It’s deadly, zero safety equipment. I always wear a face shield and watch that blade like a hawk. On the positive side it rips the douglas fir 2x4s pretty nice with a new blade. And it knocks out these recesses in the deck and bunk bearers. The build directions show using a hand held back saw to cut each side then using a chisel to take the meat out. I did a few this way, but I can do 12 on the table saw in the same time as one by hand. Also the 1” belt sander gets a fair workout. It’s great for final shaping but it’s powerful and a light touch is needed.
First set the blade height.


Make repeated careful passes. 

Deck bearer is ready.

Sometimes a touch of the belt sander cleans up the notches then a chisel to clean the corners to finish the job.

Friday, September 2, 2011

Clamps - 21 Hours

You can never have too many clamps when boat building! Here are 30 brand new Harbor Freight bar clamps put in to action! The 20 6-inch bar clamps are on the keel and the other 10 12-inch clamps are on the Stem Post (forward most part where the hull sides come together) on the far side of the table. I have to crawl under the table to use that side, but using a moving dolly it’s not too bad to scoot under. It also really helps that Donna is on the front side mixing epoxy for me so I don’t have to scoot back and forth.