 |
| Capt. Slocum sailed out of Boston Harbor aboard Spray April 24, 1895 |
Wednesday, April 24, 2013
The Spray set sail, 118 years ago
I the first time I read "Sailing Alone Around the World" about 20 years ago I thought I could appreciate the adventure but I realized later as I became a more experienced sailor I really didn't understand. It really was a different world, technologies that we today take for granted, GPS, and even some we consider obsolete, LORAN, were not even imagined in 1895. And my current dilemma of outboard engine choice would not have merited a moments though back then. Unfortunately we still have the water borne thieves we romantically call pirates.
I hope I can have Tiki #164 completed by the 119 anniversary of Spray leaving Boston harbor.


Monday, December 17, 2012
I have a confession to make........
Ok here goes.... I love full keel heavy displacement sailboats. I know that doesn't sound too strange to a stranger but to anyone how knows my history... well it's a discontinuity. My sailing experience and ownership goes something like this..Hobie Cat 16, much bigger racing Cat, racing on a couple 30 something fin keel boats, 10m cruising Cat, self built sailing pram, 26ft cruising Cat, and now building a Wharram Tiki 30 catamaran.
But the truth is I've always looked at Westsail 32s and smiled a happy smile. I don't know what happened decades ago to caused the neural paths in my brain to say that boat just looks "Right". And not just Westsail 32s, but just about any double ender. Then there is another style that trigger the "Right" sailboat neurons and that is epitomized by the Pearson Triton/Alberg 30/Pearson Vanguard 32.
The result is that I'm constantly on the prowl looking at these old boats, and I do mean old from 1959 to the mid 1970s. So naturally while we're in the Annapolis MD area for several weeks I can't help but look for deals in this target rich environment.
Well I happened across Phoenix a 1960 Pearson Triton #190 in Rock Hall, over on the eastern shore of Maryland. She's rough but had a new spar and rigging installed in the early 1980s. But there was a small problem, there was a large yard bill at the marina, about $2500. The boat was not worth that much to me so after negotiating with the yard manager and PO, I ended up paying $500 out of pocket for Phoenix. This includes storage until May 2013, unstepping the mast and loading her on to my trailer. Not a bad deal for me and the yard gets a non productive boat out of a packed yard. Now I just need to buy a trailer the can handle about 8000lbs.
My intention is to set up Phoenix minimally as a daysailer and occasional weekender and maybe some Wednesday night PHRF racing. I'll be putting her on a mooring in Belfast harbor but before that she needs some work. I'll document the raise of S/V Phoenix in another Triton blog. Just a side note, the 1965 movie "The Flight of the Phoenix" is great.
But the truth is I've always looked at Westsail 32s and smiled a happy smile. I don't know what happened decades ago to caused the neural paths in my brain to say that boat just looks "Right". And not just Westsail 32s, but just about any double ender. Then there is another style that trigger the "Right" sailboat neurons and that is epitomized by the Pearson Triton/Alberg 30/Pearson Vanguard 32.
The result is that I'm constantly on the prowl looking at these old boats, and I do mean old from 1959 to the mid 1970s. So naturally while we're in the Annapolis MD area for several weeks I can't help but look for deals in this target rich environment.
Well I happened across Phoenix a 1960 Pearson Triton #190 in Rock Hall, over on the eastern shore of Maryland. She's rough but had a new spar and rigging installed in the early 1980s. But there was a small problem, there was a large yard bill at the marina, about $2500. The boat was not worth that much to me so after negotiating with the yard manager and PO, I ended up paying $500 out of pocket for Phoenix. This includes storage until May 2013, unstepping the mast and loading her on to my trailer. Not a bad deal for me and the yard gets a non productive boat out of a packed yard. Now I just need to buy a trailer the can handle about 8000lbs.
My intention is to set up Phoenix minimally as a daysailer and occasional weekender and maybe some Wednesday night PHRF racing. I'll be putting her on a mooring in Belfast harbor but before that she needs some work. I'll document the raise of S/V Phoenix in another Triton blog. Just a side note, the 1965 movie "The Flight of the Phoenix" is great.
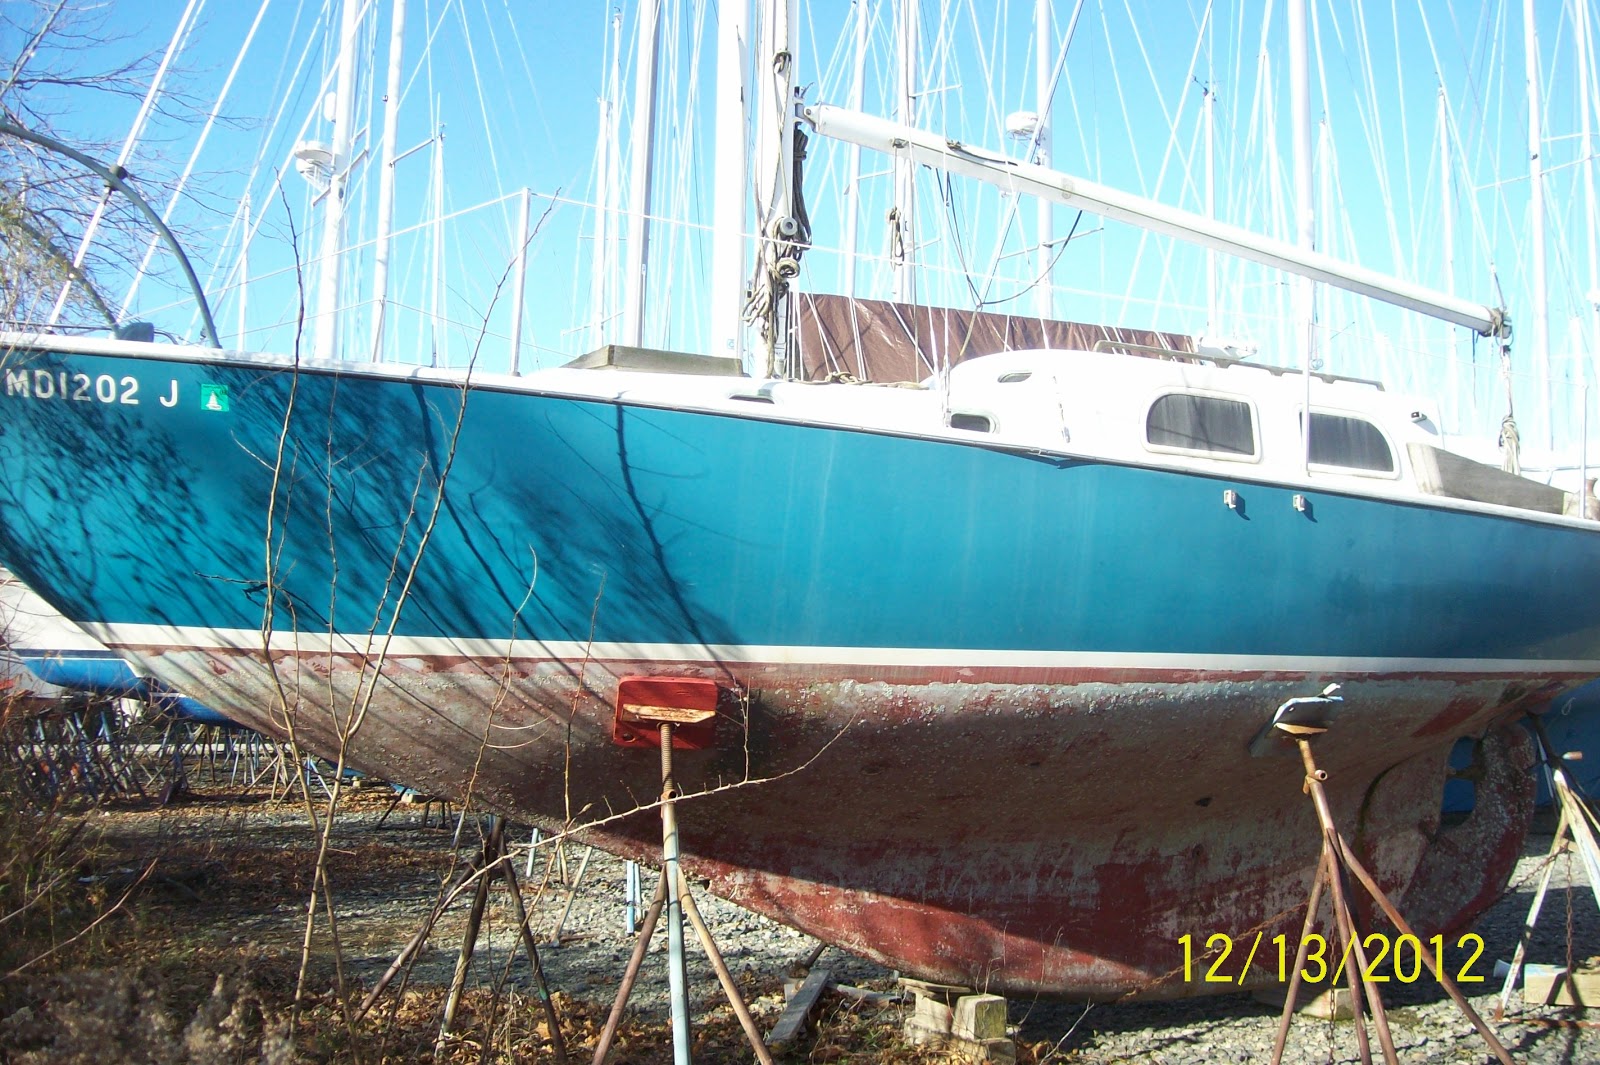 |
| Actually the Teal color looks pretty good in person. A yard man said Phoenix has been sitting here unloved for at least 12 years. |
 |
| An ex-husband heisted the motor years ago, another interesting story:) |
 |
| The starboard port is missing the securing nut/bolt. A piece of Duck tape and wire is keeping it closed. |
 |
 |
| I like that name, I think I'll keep her. |
 |
| I pumped her out and a few tarps to keep the worst of the winter out. |
Friday, July 6, 2012
Checking In and another Tiki build(how not to)
Checking In. It’s been a few weeks since Tiki #164 has gotten any love. I have a great excuse however, we live in a 34 diameter concrete geodesic dome that we bought about two years ago. The house is a project all itself. When we bought it only stud framing and subfloors were mostly done. No plumbing beyond a well feed to a water tank. No electrical beyond the breaker panel. And just a few pieces of drywall leaning against the studs. Oh and the reason we got it cheap, it leaked. So tas much as I’d like, the Tiki can’t get our undivided attention. The past few weeks have been tiling the house bathroom, building knotty pine walls, and building kitchen cabinets. We’re heading off to a wedding and visiting family soon so I’m hoping to be back to work on Tiki #164 by mid August.
But a man can not survive on kitchen cabinet builds alone, well I can’t at least:) I need at least a weekly boat fix, so when a pair of Tiki 26 hulls showed up on craigslist I called the guy and told him I’m just curious to seem them since I’m building a Tiki 30. It wasn’t too far away and it was a great lesson…. on what not to do.
This is the major problem buying a Tiki secondhand, each is handmade by people ranged in talent from a master shipwright who’s joinery work would be a match for the finest yachts built to someone who really shouldn’t be trusted with power tools and who’s work is not so much seaworthy as dumpster worthy. These hulls were built by the latter type person. Strangely, it inspires me to see this junk, while I might not hit master shipwright standards I’m a hell of a long way from this trash. The pictures are of just a few build issues. These hulls also suffered from weather exposure. A sample of the problems was fiberglass that was delaminating along the hull to deck join due to the exterior stringer at the top of the hull topsides being rotted.
 |
| The gap above the bulkhead is easy to see, but the wedge on the center stringer isn't so obvios:) I also wonder how much sea time it would take before the knot above the left stringer pops out? |


Friday, June 15, 2012
Bulkheads almost there:) ------ 222 hrs
The bulkheads are very nearly completed. I expect that this set of bulkhead took only half as much time to build as the first set. It would have been quicker but of course we changed something:) Some of the savings comes from experience but I think most comes from building all the bearers at one time. Then attaching as many bearers at once that can be installed. I say “as many” instead of “all” since some flipping to put on opposite side bearers is required naturally and we have to wait for the epoxy fillets to “kick” (start to harden) which in our 60degF basement sometimes takes several hours.
 |
| Tables of drying epoxy |
The other part that really sped things up that I forgot to mention was using a couple to as many as five #6x3/4inch bronze wood screws to initially attach the bearers. First clamp the bearer in place then drill the pilot holes then drilling the countersink on each. Next I screw the bronze screws filly in to make sure the alignment remains constant when the final glueing without clamps is done. Then we butter the bearer with epoxy and install using the screws. We only tighten enough to get an even light squeeze. Many times the screws are not fully seated. Now since no clamps, weights, holders are being used we can immediately install the epoxy fillet on the lower side. I used bronze so that they can just remain in place. After a day the screws are driven home and covered with epoxy fairing(just same stuff used for fillets)
 |
| Fast and more sure attachment method. |
 |
| Slower bearer attachment method. I do this when there is a bearer directly opposite. |
Now the “something” adding to our build time. We decided that all under bunk/floor storage areas are going to get covered in 6oz fiberglass in addition to the specified two coats of clear epoxy. The rationale is that items stored there can shift and easily damage a clear epoxy coat. By adding 6oz cloth the surface become much more abrasion resistant as well as water proof. My guess is this will add no more than a few pounds overall.
Here is another Wharram plans hard read. Is it 23mm or maybe 28mm? I decide to just go with 25mm, guess I’ll see if it really makes a difference later:)

Wednesday, June 13, 2012
Still in the 2D world --- 211 hours
We still haven’t progressed much in to the 3D world. After getting BH4 and BH6 all shipshape in their slots I had to really start thinking about the gallery layout. The reason I hadn’t given it much thought so far is that for the longest time I had it in my head we were building the Port hull. For some reason had been thinking the cabin tops sloped inwards. They don’t !! They slope outwards:O No where on the bulkhead drawings does it say “Starboard reverse for Port”. Just have to keep in mind that slope. No harm really because at this stage only BH3 and BH6 are different and only once the floor/bunk/deck bearers are installed. So after a posting some questions on Wharram Builders and Friends I decided to punt and just build the real Port bulkheads since I’ve given that hull much more thought.
Speaking of misreading the plans. I’ll fully admit I’ve made a few goofs of my own making, but I’ll also show that these plans need to be view with a magnifying glass. In the first picture showing BH2, the hull max curve point shows 19mm, but if you don’t look closely it appear 9mm. OK step closer and all is good. The next picture is of the cross beams. I studied this page and I, and a few other Tiki 30 builders, came to the conclusion that the aft and central beams are the same length.
 |
| To tired eyes that small line next to the circle in the nine begins to look like dust:) |
 |
| I've already written the explaining note, but imagine if it were not written. Is it obvious the aft and center are different? |
 |
| There is the key! One beam is 50mm shorter, next question is which? |
But back to bulkheads. Yesterday I had an insight, “production line”! Once the Port side bulkheads are cut out of the 6mm plywood the next step is to make and install about 20 floor/bunk/deck bearers. So instead of working each bulkhead I decided to mill all the bearers then center and make all notches. This saved repeated setup of the table saw and other tools used. I’ll bet it took half the time to make them this way saving several hours. By the end of today we had epoxied about half of them on to bulkheads and it worked great! Port bulkheads should be complete tomorrow.
 |
| All port side BH floor/bunk bearers cut to approximate length and notched. I built the four deck bearers after the picture. |
Friday, June 8, 2012
Going 3D!!!! ----180hrs

Today there was a small thrill. The boat build went 3D! We set the keel up in the hull cradles then test fit bulkheads 3 and 4 that slot into the keel. Glad that we did since it took some tweaking(sanding) to get the bulkheads to slot all the way down. All it took was seeing bulkhead 3 in place to put the idea of building both hulls simultaneously is out of the question.

On the bulkhead front, we got the Beckson 8inch inspection plates via the Brown truck so I cut the holes in BH1,BH6, and BH7. Next I did that little extra not in the plans, over drilled the mounting holes, filled with epoxy, and drilled the final holes. Now the plates are set aside for few months.


Wednesday, June 6, 2012
How long should it take to build?

Are people who choose to build a Wharram catamaran, by that very choice, unable to follow plans? This thought came to me as I puzzled out the rudder hinge locations. The plan has a recess cut then 5 holes drilled, and Voila! In 10-15 minutes it done. And in less than two hours all eight are done and time to move on to other projects. Heres the point at which every builder, including me, that I’ve seen “improves” on the hinge. Mill out an oversized slot, fill with epoxy, add extra abrasion resistance, then drill out 5 holes through the epoxy. That series, in my case, gets this hinge up to the 1+ hour range. And this type of “improvement” is done over and over and over during the build. There is no doubt that I, and I’m sure other builders, think these improvements are highly desirable, if not needed. These changes all attempt to improve on the boat’s durability, strength, safety, comfort, or beauty. The key point is that these boats are not built strictly to the plan.
So I think it’s not really fair to carp at Mr Wharrams build time estimates(900hrs for the Tiki 30) since I don’t know of anyone building a Spec boat. I’m just as guilty, right there on my side bar I say in a somewhat snarky tone “big grain of salt” about the estimate, but hey wait minute, I’m the one deciding not build to Mr Wharram plans. So I’ve changed the sidebar to be more fair to Mr Wharram.
Subscribe to:
Posts (Atom)